Sony FX5 Expert Kit (OpenRig®)
B4004.0064
B4004.0064
$549.00
Available to Backorder
Skip to product information

Sony Shooting – The Expert Kit features a range of universal rigging options as well as purpose-built FX5 accessories.
Mixed Mounting – Attach the Expert Kit Rail to DJI gimbals, Manfrotto tripods, and more.
Easy Rigging – Rig the cage, not the camera with the OpenRig® and Halo combo.
Clean Builds – Customise your rig with additional mounting options including 1/4", 3/8”, MAP M4, QD and Cold Shoe mounts.
Quick-Release Convenience – Attach and detach the camera in multiple places for easy setups and pack-downs.


Level:
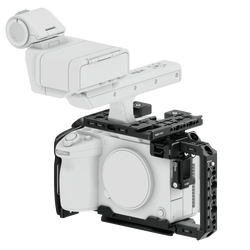
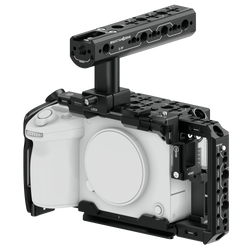
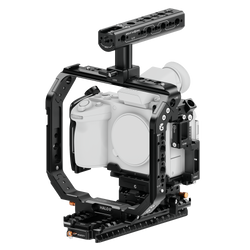
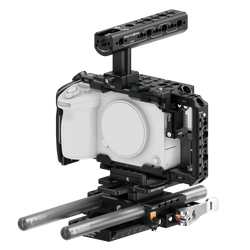
Description
Cut out the gatekeeping, cut out the jargon, and cut out the downtime: the Sony FX5 Expert Kit gives you a versatile and streamlined rig for any shooting setup.
What's Included:
Bring the future to your next gig. The Sony FX5 Expert Kit combines the latest camera technology with the latest rigging revolution. Avoid strain on your camera body by rigging the surround cage, not the camera itself. With a huge selection of mounting options, and compatibility with tripods and gimbals of all shapes and sizes, you’ll be able to build the best rig for any gig.
Get it in one with the Sony FX5 Expert Kit today.
Single-Purchase, not Single-Use
Whether the FX5 is your first cine camera or just the latest in your lineup, you won’t need to re-learn how to build your rig from the ground up. The OpenRig® system is intuitively designed to give you a convenient rig for any camera system. Learn one system, once, and be ready for anything.
No Gatekeeping
AC dropped out at the last minute? With the OpenRig® system, you don’t need to painstakingly rehash all the little quirks of your rig from camera prep. You don’t need to carry around a dozen Hex Keys and remember exactly what order to mount the different parts of your cage: just clip it onto the OpenRig®’s NATO rails and get back to shooting.
Camera-Agnostic
Your camera is one of the most expensive things you own (or rent). Avoid putting strain on it with our Halo Universal Camera Cage: rig the cage, not the camera. The ultra-strong design of the Halo can take the weight of the bulkiest accessories without breaking a sweat, reducing the stress on your camera body – and you.
Quick-Release Convenience
If you need to go handheld for a shot or take a quick still, the FX5 Expert Kit makes it easy to detach your rig. The Bottom Plate has a built-in Arca dovetail plate, so it’s always easy to grab an insert. Simply flip the lever on the Arca Receiver to detach your camera from the rig. If you need to bring the whole rig with you, the OpenRig® Rail’s dovetail is just as easy to release from Manfrotto tripods or DJI gimbals.
Get a Grip
When you’re shooting those handheld shots, you’ll have two grip options to keep things steady. Our FX5 Right Side Plate contours to the camera shape, retaining that comfortable grip of the stripped-down camera. For a balanced build, the Create Top Handle automatically centres itself on the rig thanks to the built-in magnets.
FX5 Foundation
This is just the beginning. If you need to rig any specialist gear or accessories, the OpenRig® is a system that is both forwards-thinking and backwards-compatible. The universal design fits to any camera setup, and the ever-expanding range of accessories mean that your camera rig can grow with you – wherever your journey takes you.
Part of the Sony FX5 System
The future is here: the Sony FX5 is the latest and greatest cinema camera, so make sure your camera has the cage it deserves. Bright Tangerine Sony FX5 accessories are all designed to the highest standard, so you always have the best camera rig for the job.
The Sony FX5 Expert Kit (OpenRig®) comes with all required components, but you will require a 3mm Hex Key in order to assemble it.
Bottom Plate to Camera
1. Align the two mounting screws with the threads on the FX5 base.
2. Use a 3mm Hex Key to tightly secure them in place.
Side Plate to Camera
1. Align the bottom screw with the indented thread on the FX5 Bottom Plate, and the top screw with the thread on the FX5’s body.
2. Use a 3mm Hex Key to tightly screw both screws into their respective threads.
Corner Plate to Camera
1. Align the Corner Top Plate so that screws align with the threads on the top-left of the FX5 camera body: the open end of the Cold Shoe mount should be pointing forward.
2. Use a 3mm Hex Key to tighten Corner Top Plate into place.
HDMI Clamp to Cage
1. Align the screw thread of the HDMI Clamp with the marked gap on the Corner Plate.
2. Insert your HDMI cable and align the Clamp so that the flat base of the cable is flush with the Clamp.
3. Use the 2.5mm Hex Key to fully tighten the Clamp to the Side Plate.
4. Secure the HDMI cable in place by tightening the thumbscrew.
USB-C Clamp to Cage
1. Insert USB-C cables into the top and/or bottom cable slots on the FX5.
2. Use a 2.5mm Hex Key to tighten the respective Clamp and secure them in place.
3. If over-tightened, press on the marked section of the clamp to relieve some pressure.
Arca Receiver to Arca Base
1. Align the screws on the Arca Base with the threads on the bottom of the Arca Receiver – the Receiver should sit with the “G” logo facing the front.
2. Use the included flathead screwdriver to secure the Receiver in place.
Bottom Plate to Arca Receiver
1. Loosen the Receiver’s lever clamp and slide the FX5 into place.
2. Re-tighten the lever clamp.
Arca Base to OpenRig® Rail
1. Slide the Arca Base into the central channel of the OpenRig® Rail – with the safety engaged, you will be able to precisely position the camera at different intervals.
2. Use the winged-lever clamp to secure the Base in position on the Rail.
Halo to OpenRig® Rail
1. Slide the Halo on to the dual NATO rails on the OpenRig®.
2. When positioned, use the winged-lever clamp to secure it in place.
Top Handle to Halo
1. Slide the NATO clamp onto the Halo’s top NATO rail – it should automatically centre via the magnets.
2. Use the lever clamp to tighten the Top Handle into place.
Bottom Plate to Camera
1. Align the two mounting screws with the threads on the FX5 base.
2. Use a 3mm Hex Key to tightly secure them in place.
Side Plate to Camera
1. Align the bottom screw with the indented thread on the FX5 Bottom Plate, and the top screw with the thread on the FX5’s body.
2. Use a 3mm Hex Key to tightly screw both screws into their respective threads.
Corner Plate to Camera
1. Align the Corner Top Plate so that screws align with the threads on the top-left of the FX5 camera body: the open end of the Cold Shoe mount should be pointing forward.
2. Use a 3mm Hex Key to tighten Corner Top Plate into place.
HDMI Clamp to Cage
1. Align the screw thread of the HDMI Clamp with the marked gap on the Corner Plate.
2. Insert your HDMI cable and align the Clamp so that the flat base of the cable is flush with the Clamp.
3. Use the 2.5mm Hex Key to fully tighten the Clamp to the Side Plate.
4. Secure the HDMI cable in place by tightening the thumbscrew.
USB-C Clamp to Cage
1. Insert USB-C cables into the top and/or bottom cable slots on the FX5.
2. Use a 2.5mm Hex Key to tighten the respective Clamp and secure them in place.
3. If over-tightened, press on the marked section of the clamp to relieve some pressure.
Arca Receiver to Arca Base
1. Align the screws on the Arca Base with the threads on the bottom of the Arca Receiver – the Receiver should sit with the “G” logo facing the front.
2. Use the included flathead screwdriver to secure the Receiver in place.
Bottom Plate to Arca Receiver
1. Loosen the Receiver’s lever clamp and slide the FX5 into place.
2. Re-tighten the lever clamp.
Arca Base to OpenRig® Rail
1. Slide the Arca Base into the central channel of the OpenRig® Rail – with the safety engaged, you will be able to precisely position the camera at different intervals.
2. Use the winged-lever clamp to secure the Base in position on the Rail.
Halo to OpenRig® Rail
1. Slide the Halo on to the dual NATO rails on the OpenRig®.
2. When positioned, use the winged-lever clamp to secure it in place.
Top Handle to Halo
1. Slide the NATO clamp onto the Halo’s top NATO rail – it should automatically centre via the magnets.
2. Use the lever clamp to tighten the Top Handle into place.
The Sony FX5 Expert Kit (OpenRig®) features a mix of universal accessories and accessories purpose-built for the FX5: with dedicated mounting layouts. The Right Side Plate and Bottom Plate are specifically designed for the camera, but the OpenRig® system is compatible with any camera. The Expert Kit can be used with the Sony FX5 EVF or the XLR handle, though space between the Halo and the handle may be limited depending on placement.
From our UK base, we manufacture camera accessories to the highest standards of quality and sustainability. All products are designed and engineered rigorously, to maximise their usefulness to professional filmmakers. If you encounter any issues with our products, our customer service team is on-hand to help you however you may need.
24 months
| Weight | 1.264 kg |
|---|---|
| Dimensions | 20 x 18 x 18 cm |